

How To Create A Scrolling Banner In Html

Introduction to Scrollbar in HTML
A horizontal or vertical bar that is used to move a viewing area in a window, up, down, left or right using a mouse or a touchpad or a keyboard. You can click on the track to get the scroll bar to a specific portion of the window or click on the bar and drag the bar to a specific location. Below is a screenshot of a scroll bar to help you understand more.

The above image is of our typical word document with its default vertical scroll bar. The bar, also sometimes called the handle, is used to drag the viewing area of a window. And the area on which our bar slides is called a track.
Often there are default scroll bars present on your window whether the information the window contains is overflowing or not. But nowadays, these scroll bars are made interactive; that is, if and when the information becomes overflowing, a vertical or/and a horizontal scroll bar appears.
In this article, we will try and create scroll bars or, should we say, interactive scroll bars using simple HTML.
HTML || Scroll Bar || Over Flow
HTML has a way around anything you could think of, and if not, then with the help of CSS properties, HTML makes sure you get your desired results. One such CSS property is called the 'overflow' property that is applied to a <div> tag. The 'overflow' property can be used in many ways, but we will elaborate on two of such ways in this article.
What is the Purpose of 'Overflow' Property in Scrollbar in HTML?
The 'overflow' property helps you decide that you should provide your information or data, or content overflows from your element box, like some content enclosed in a <div> tag, what needs to be done. This property helps you decide whether to show or not to show your overflowed content or mask it using scroll bars for convenient use of the content that is big for a specified visible area.
However, the 'overflow' property is used and is effective with content that is a block element with a specific height. The 'overflow' property is supported by almost all web browsers as well. The syntax is pretty simple for using this property.
Syntax:
overflow: scroll |auto|visible|hidden|initial|inherit;
From the above options, one can use any one of these values for the overflow property. One of the applications of overflow property is with <div> tags, which, when used, creates a scroll box.
Let's learn about Scrollbox.
HTML || Scroll Bar || Scroll Box
A scroll box in HTML is simply a box that is if and when in use has its own scroll bars. So if one puts his information or passage inside the scroll box, he does not need to worry about the scroll bars since they will be available at his disposal along with the scroll box.
Example of scroll box crated in HTML:

Usually, a scroll box is obtained with the usage of the <div> tag, and the customization for the bar is done using CSS properties. While creating a scroll box, we use a CSS property known as 'overflow' and set it to 'scroll' to let the browser know that it is to add the horizontal and vertical scroll bars.
Below is a simple and basic example code for an HTML scroll box with overflow:scroll.
<body>
                <div style = "width: 150px; height: 150px; line-height: 3em; overflow:scroll; border: thin #000 solid; padding: 5px;">
There is a 'div' element using 'overflow:auto' for creating scroll bars.
</div>
                </body>
This results in the explicit appearance of a scroll bar. The result you can observe in the below picture.
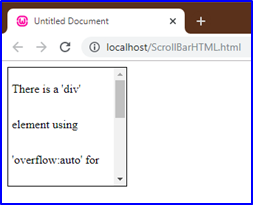
As we saw earlier, the 'overflow' property has few values that can be used. Above is an example of 'overflow:scroll'. Others are shown below:
'overflow:auto.'
It creates the same effect as overflow:scroll, but with overflow:auto, a scroll bar will only appear IF the data is overflowed; otherwise, the scroll box will appear without any scroll bars.
See below:
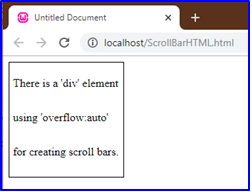

Both the above images are using overflow property with 'auto' as its value. Note that the first image has a scroll bar, whereas the second image does not have one. This is the basic function of the 'overflow:auto' property; that is, a scroll bar will only appear IF there is some data that is overflowing.
'overflow:hidden'
This property has a special purpose. Even if some data is in an overflowing state, overflow property with value 'hidden' will contain it inside the window and do not let the user know. Observe below.
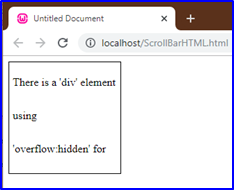
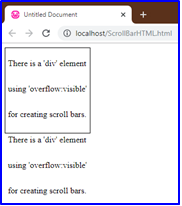
Observe that, though there is no scroll bar and the data is overflowed, yet it is perfectly contained inside the visible area. 'Overflow:visible' has the opposite effect. It shows the overflowed content, and the content displays over the visible window.
Apart from applying the 'overflow' property to a <div> tag, another attribute can be used, the <iframe> tag. Syntax and basic code for <iframe> is given below:
<body>
                <iframe src="7422324.jpg" width="200" height="200" scrolling="yes">
                </iframe>
                </body>
<iframe> tag uses overflow property with three basic values: scrolling: yes|no|auto. As the values suggest, 'scrolling:yes' provides scroll bars to the frame. 'scrolling: no' do not provide the frame with any scroll bars and 'scrolling:auto' provides scroll bars IF the content or data is overflowed.
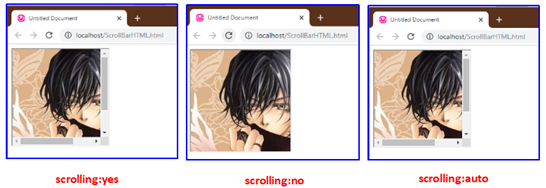
Below are three images with different values assigned to attribute 'scrolling'.
Thus we saw two different methods to add scroll bars, explicit or default.
> One was with the use of the 'overflow' property that is usually applied to <div> tags.
> And the second was the 'scrolling' attribute that is applied to <iframe> tags.
Both serve the same purpose of adding a scroll bar to your visible content.
Recommended Articles
This is a guide to Scrollbar in HTML. Here we discuss a brief overview of Scrollbar in HTML and its Examples along with its Code Implementation. You can also go through our other suggested articles to learn more –
- HTML Style Attribute
- HTML Layout
- HTML Search Bar
- Canvas Tag in HTML
How To Create A Scrolling Banner In Html
Source: https://www.educba.com/scrollbar-in-html/
Posted by: schroederfrossuche.blogspot.com
0 Response to "How To Create A Scrolling Banner In Html"
Post a Comment