

How To Draw Hands Easy Step By Step
Yes, y'all read it correct.
Hands.
The outset nightmare of all artists.
At some point in our creative journey, we all have been scared of drawing hands, we all take tried to draw them and messed up and nosotros all have ended upward giving upwardly and avoiding them for equally long as possible.
No? just me?
Well, whether you had a complicated human relationship with hands or not, as an artist we all have been in that starting bespeak where we don't know where to go or what to do, and that's why I'm here. Today, I'm going to guide y'all through the process of learning to draw hands.
And if you're a beginner and drawing hands seems like an impossible job, keep reading and at the cease of this commodity, you won't feel then lost!
What You'll Learn in this Guide
- The proportions and structure of a hand
- How do fingers work?
- How to draw a hand from different angles.
- How to draw and shade a hand from scratch.
Materials Needed for this Tutorial
- A piece of paper
- A graphite pencil from the gradation HB
- A graphite pencil from the gradation 4B
- Eraser
- Blending tool
- A ruler
All the Steps in this Guide
See below all the steps that this guide offers, laid out in one big prototype:
Section 1: The Proportions and Structure of a Manus
For these steps, we're going to use a piece of paper (recommended Fabriano paper), a soft graphite pencil from the gradation HB to 2B, and an eraser.
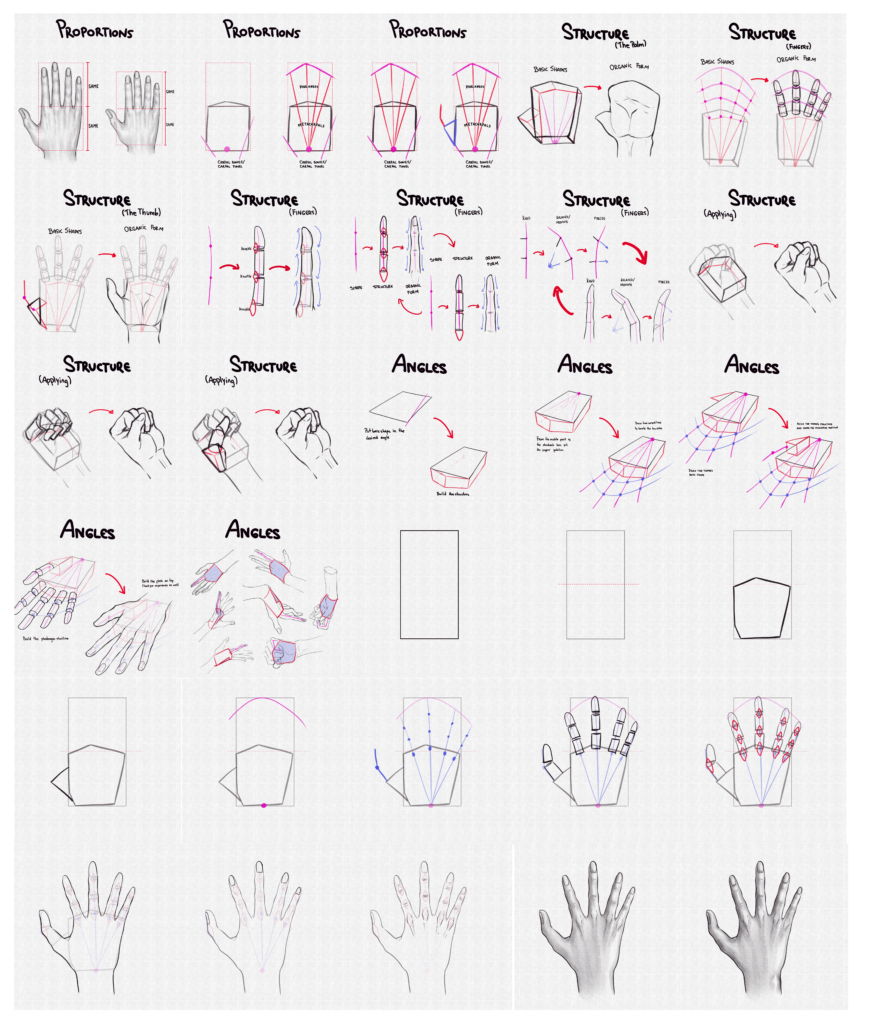
one. Proportions
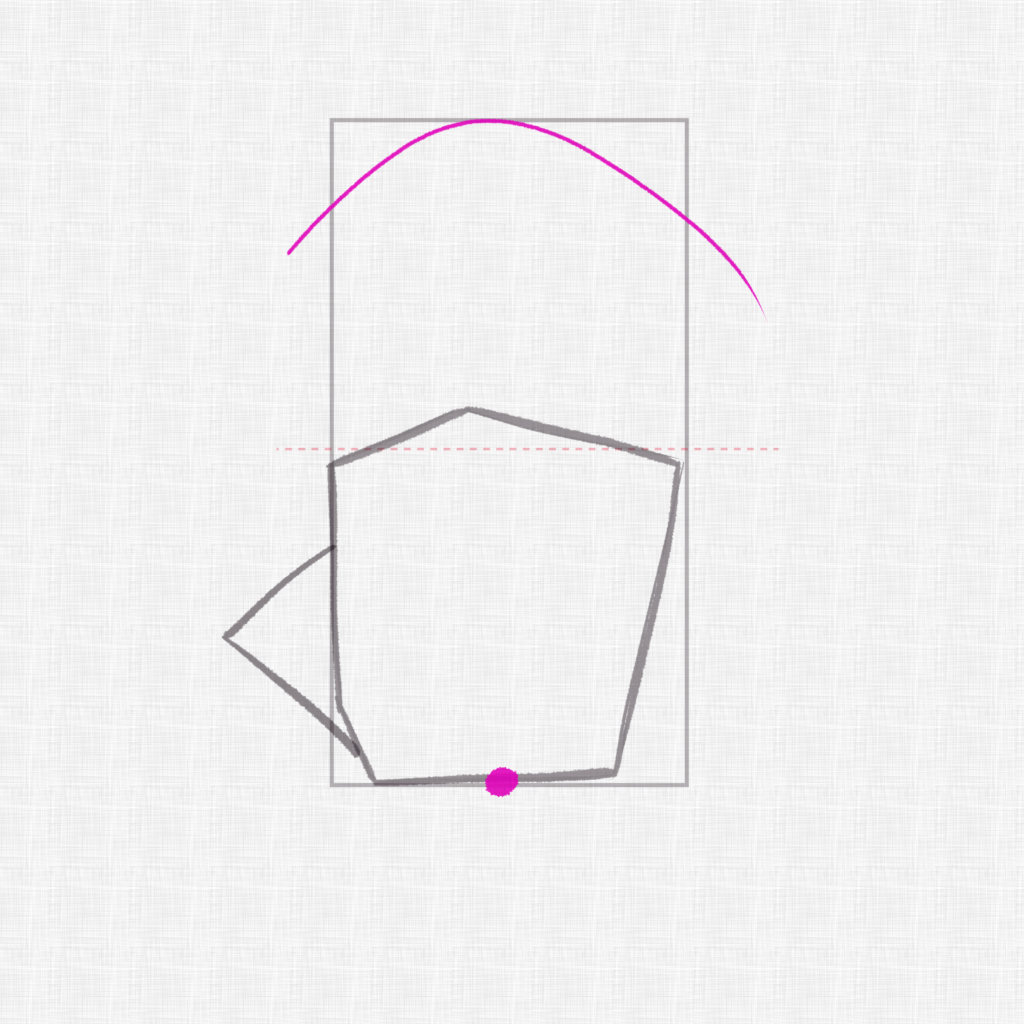
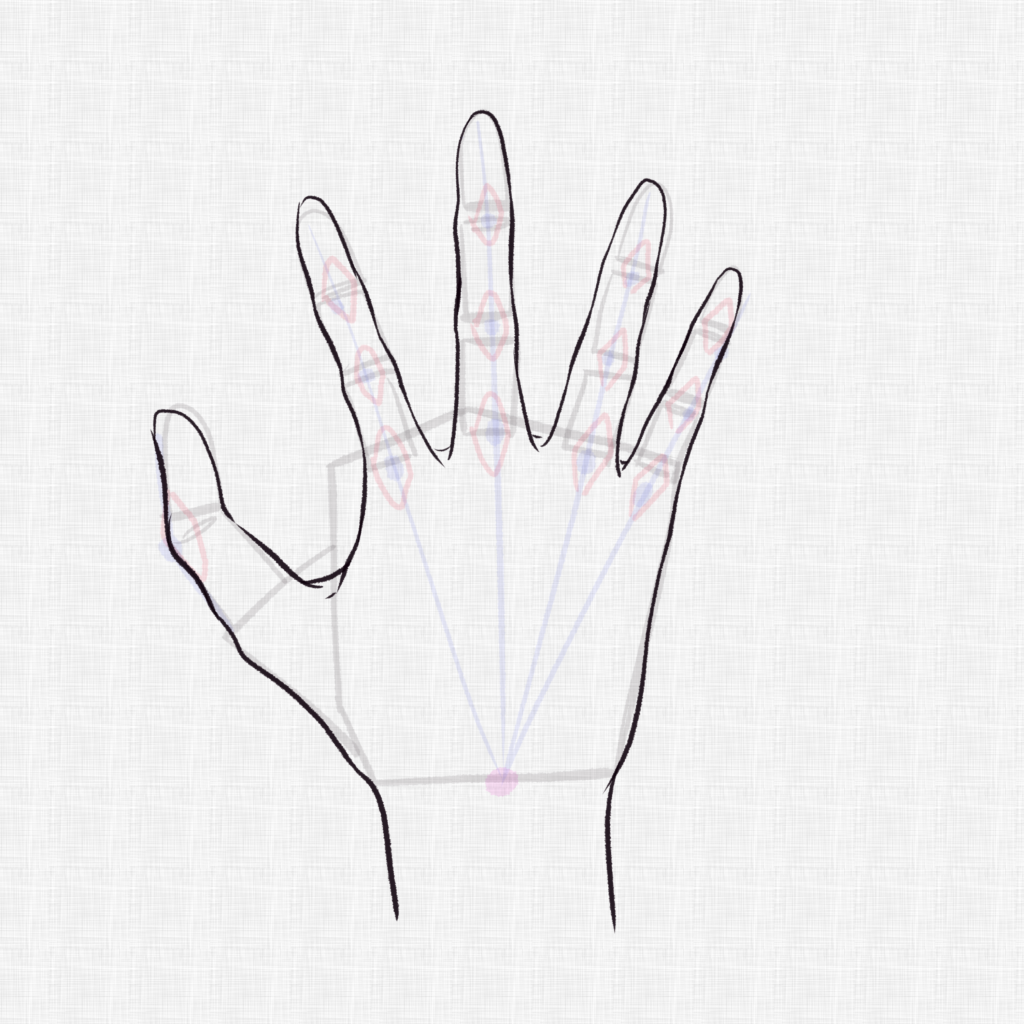
Every hand is unique. All of them go more than or less past the same proportions though. The length from the peak of the finger to the centre of the knuckle has to approximately be the aforementioned as the palm of the hand.
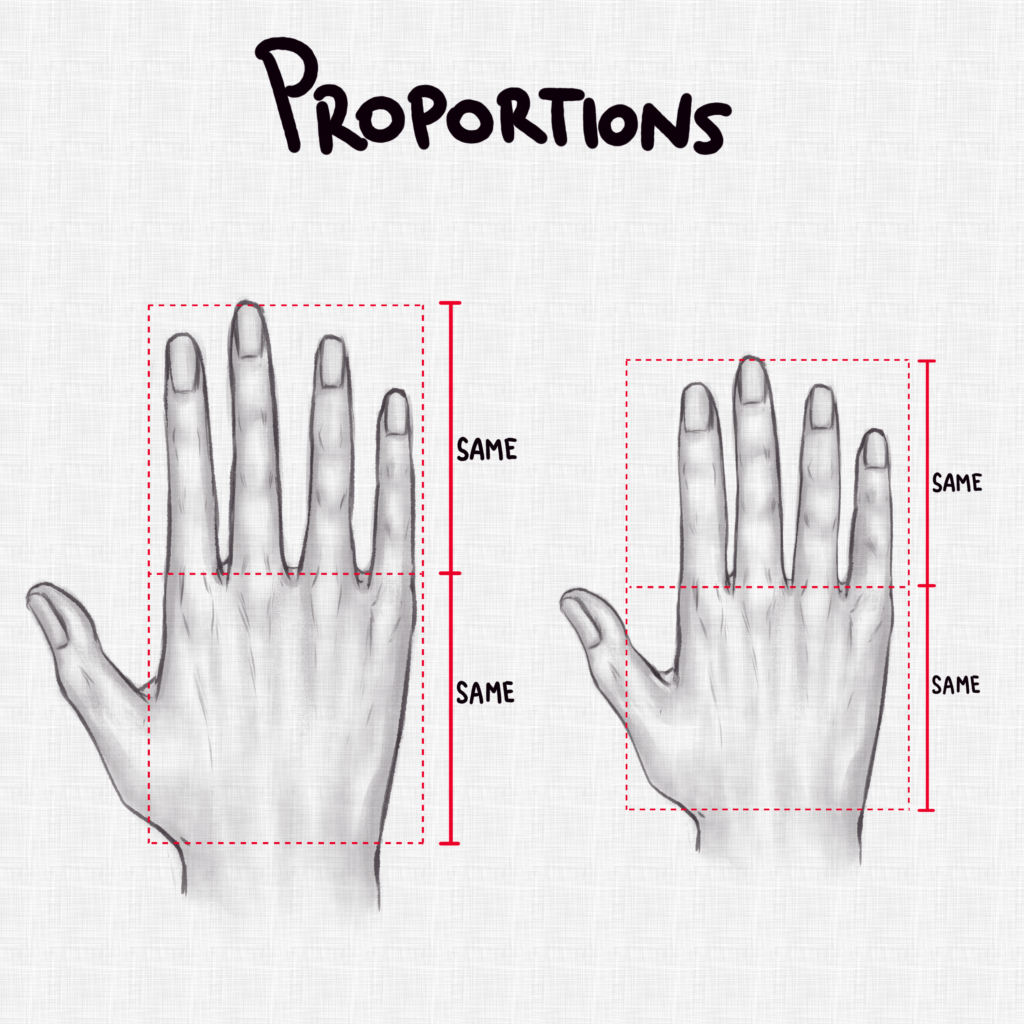
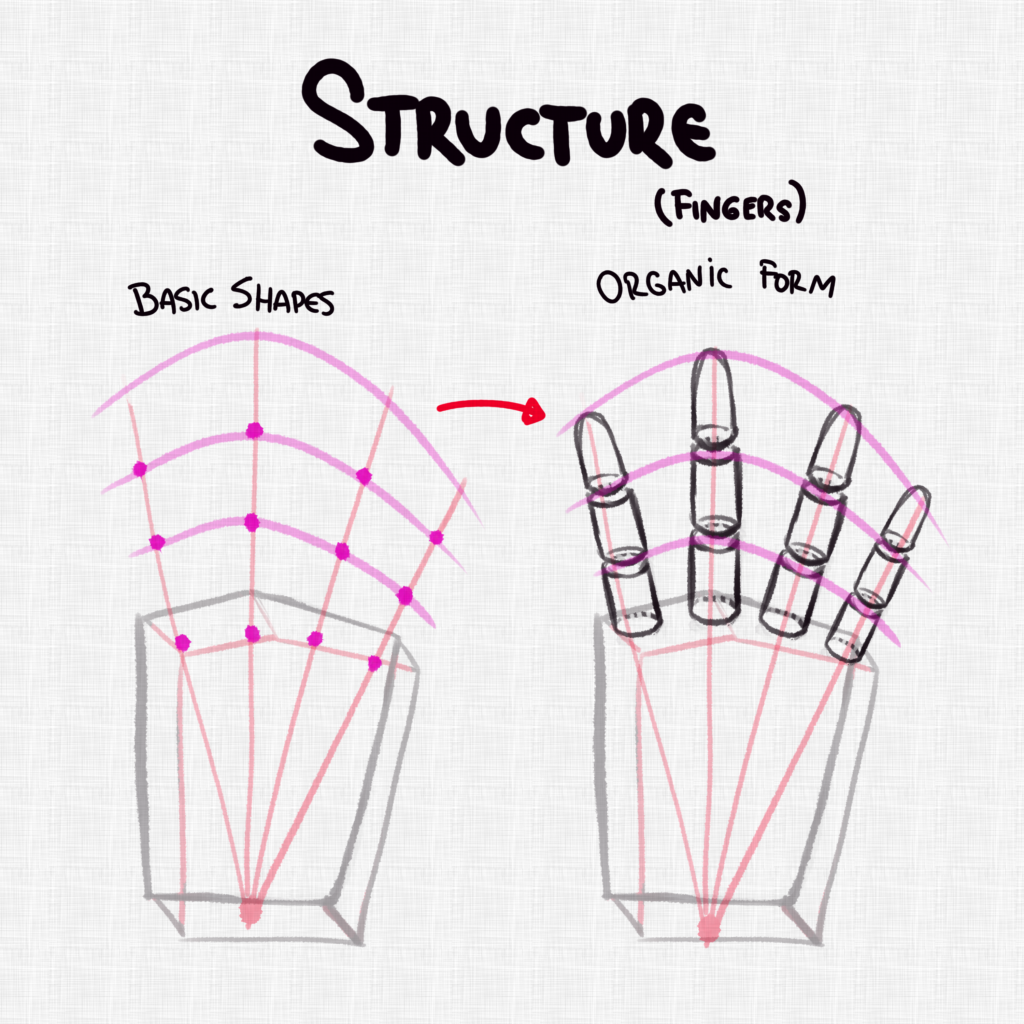
2. What About the Fingers?
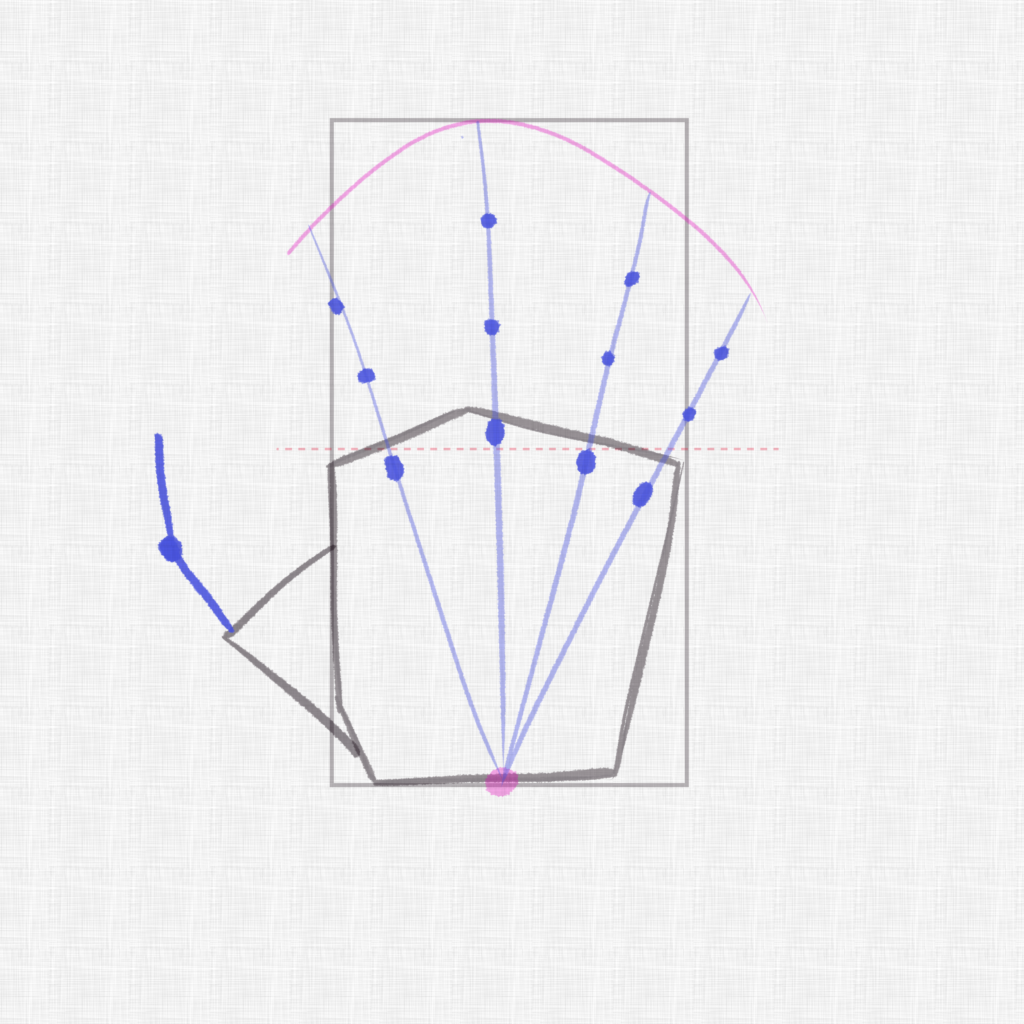
Something that's a scrap hard to get for beginners is the right position of the fingers, and to determine that nosotros don't take to necessarily look through anatomy images. it's enough to discover the middle point of the base of the hand and pull 5 lines that will represent our fingers.
Besides the basic shapes for easily has a small triangle on meridian to assistance us empathise the height difference between our fingers.
Let'south not forget the hands are not fully rectangular, so shaping them co-ordinate to the type of paw we want to draw is of import. The pink lines are the areas of the rectangle that I'll cutting for this 1.
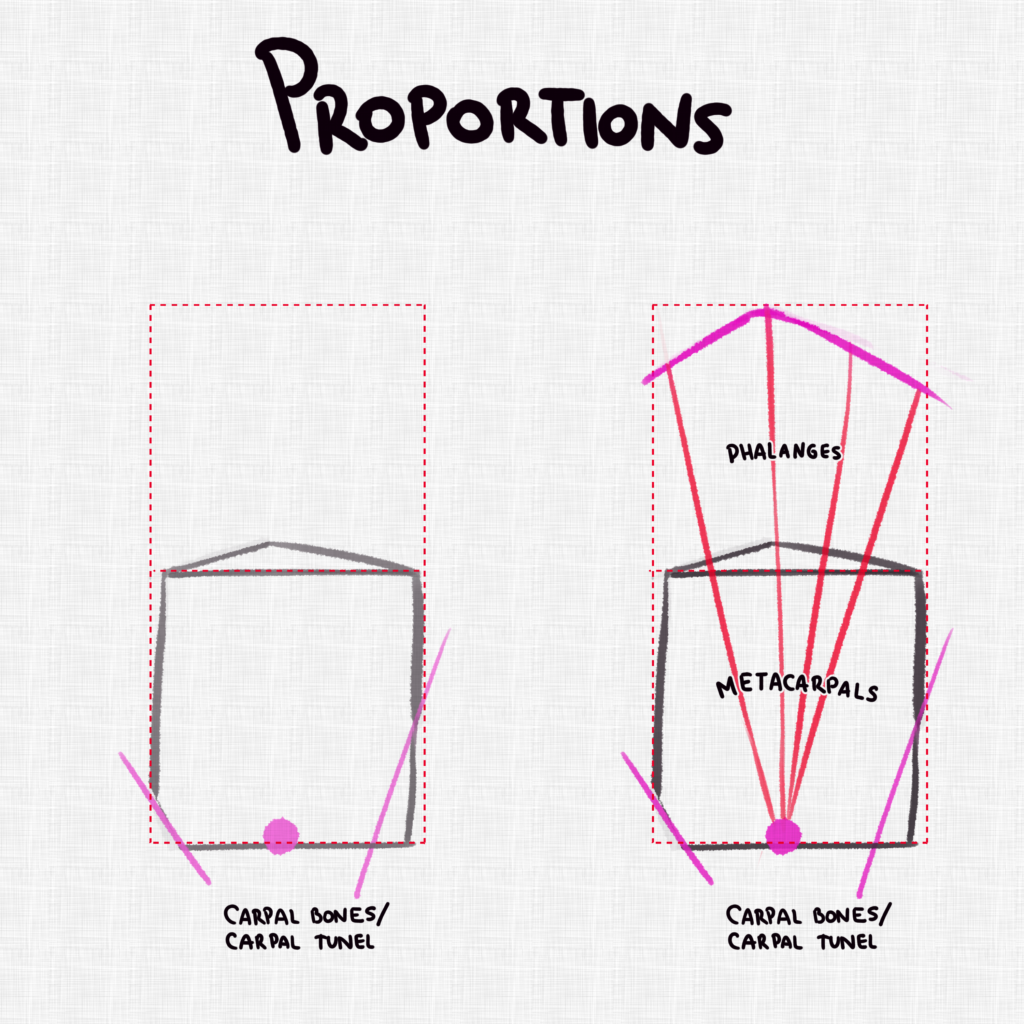
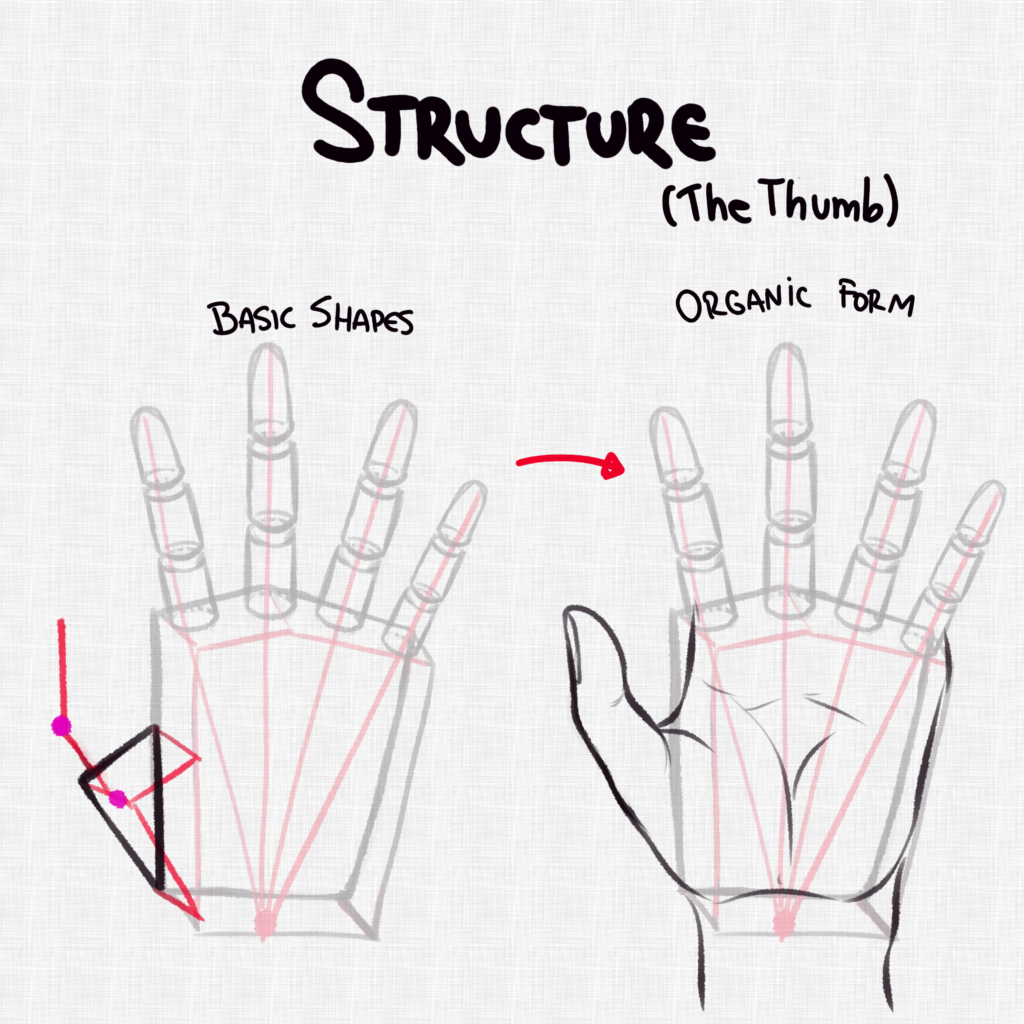
3. The Thumb
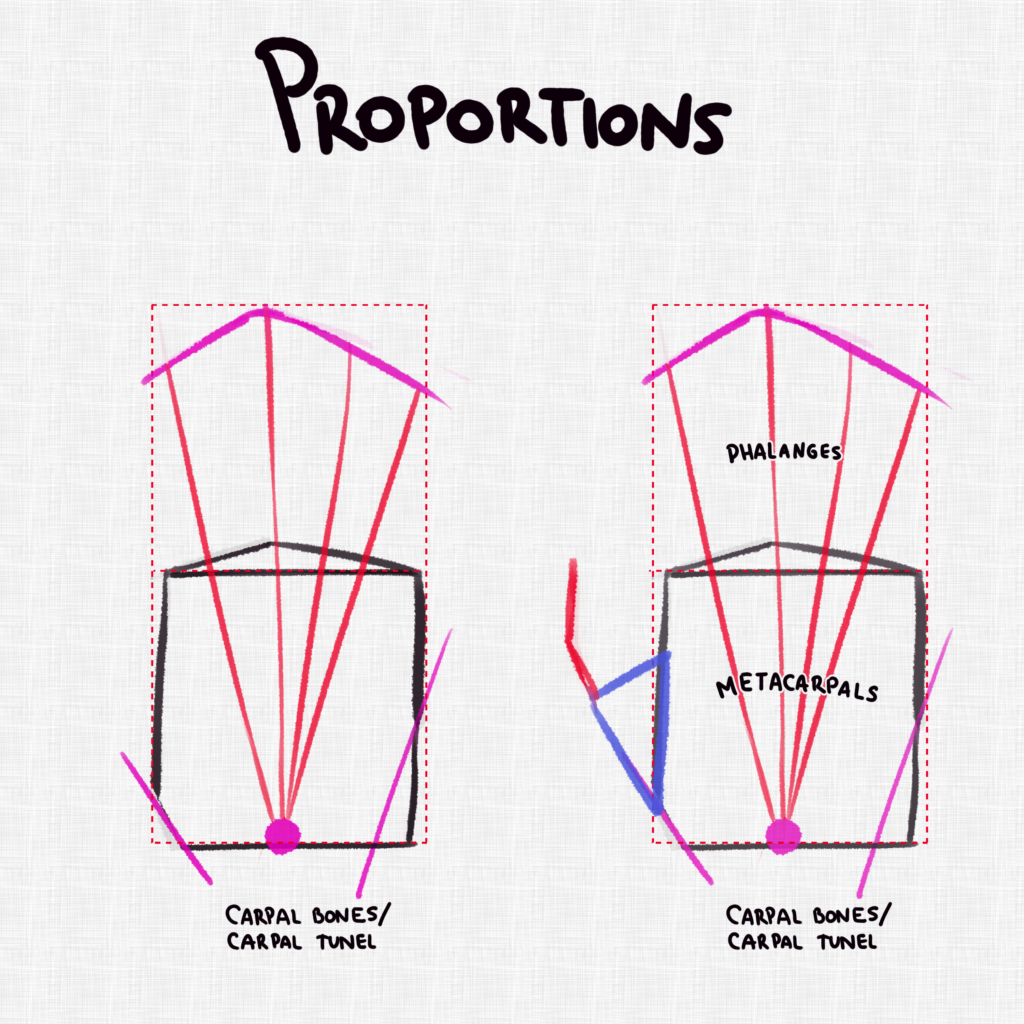
For the thumb were going to accept our structure and add a small triangle at the side. From the border of that triangle, we're going to pull an angled line to represent the pollex.
4. The Palm
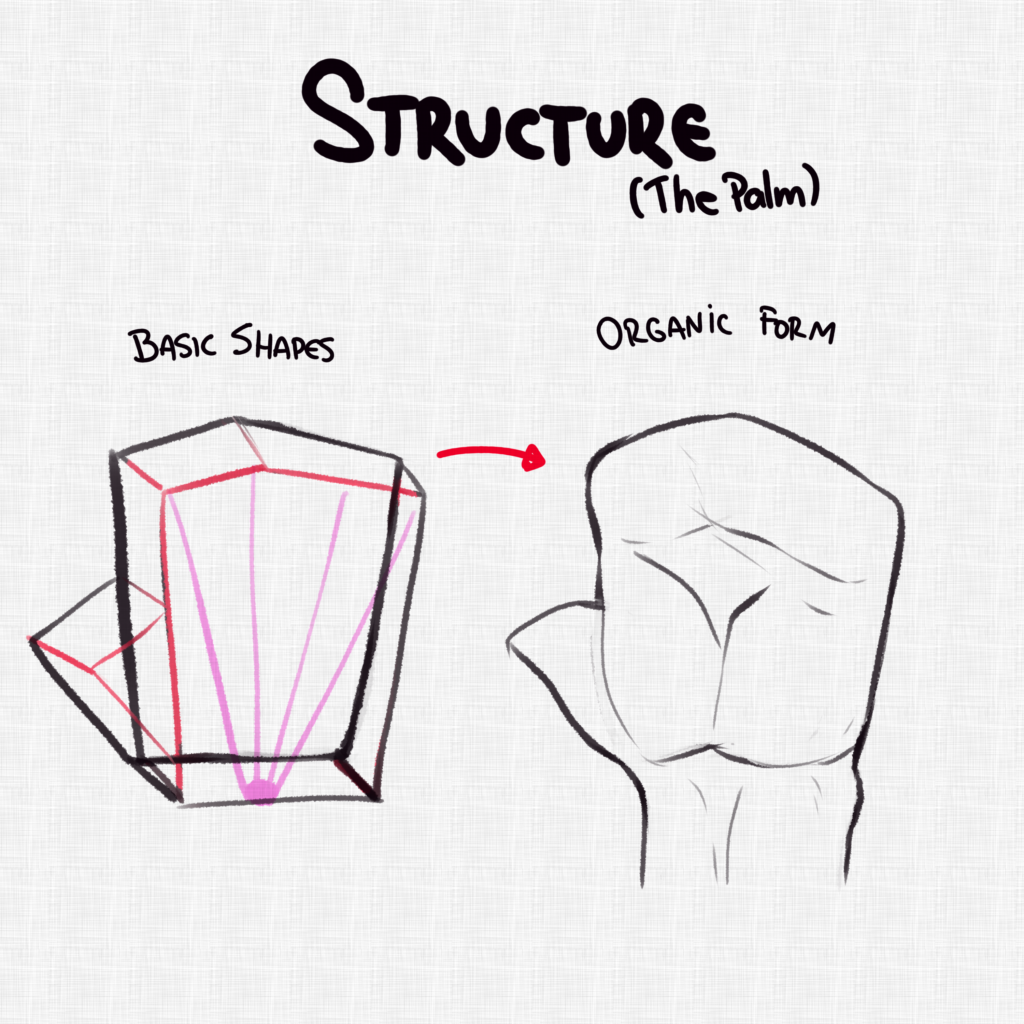
For the palm, were going to have our structure lines and plough them into shapes, from these shapes we tin can build around an organic course. Again, take a expect at the kind of hand you lot want to draw. Is it chubby? Is it skinny? The structure works either style, yet, it would expect different for unlike types of easily.
If you're unsure, you tin always practice with your ain manus.
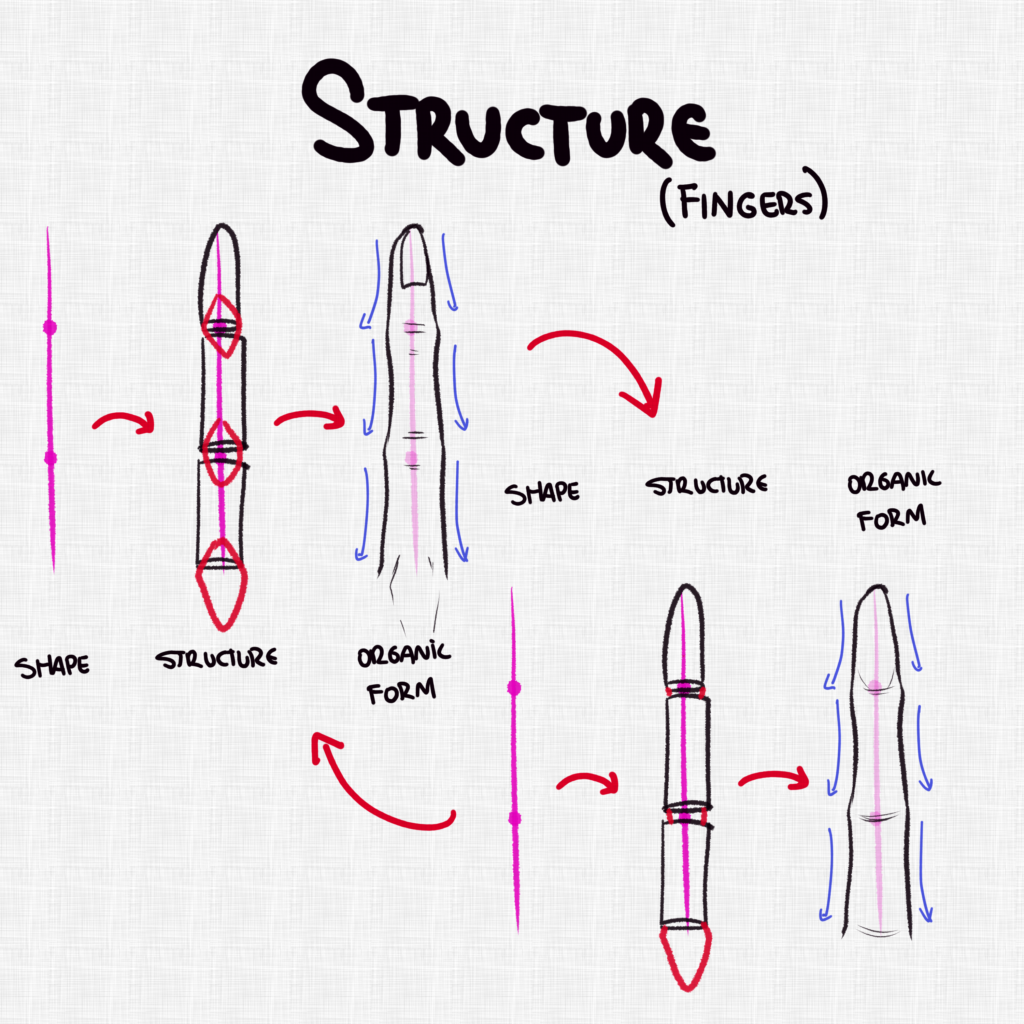
How to Depict Fingers
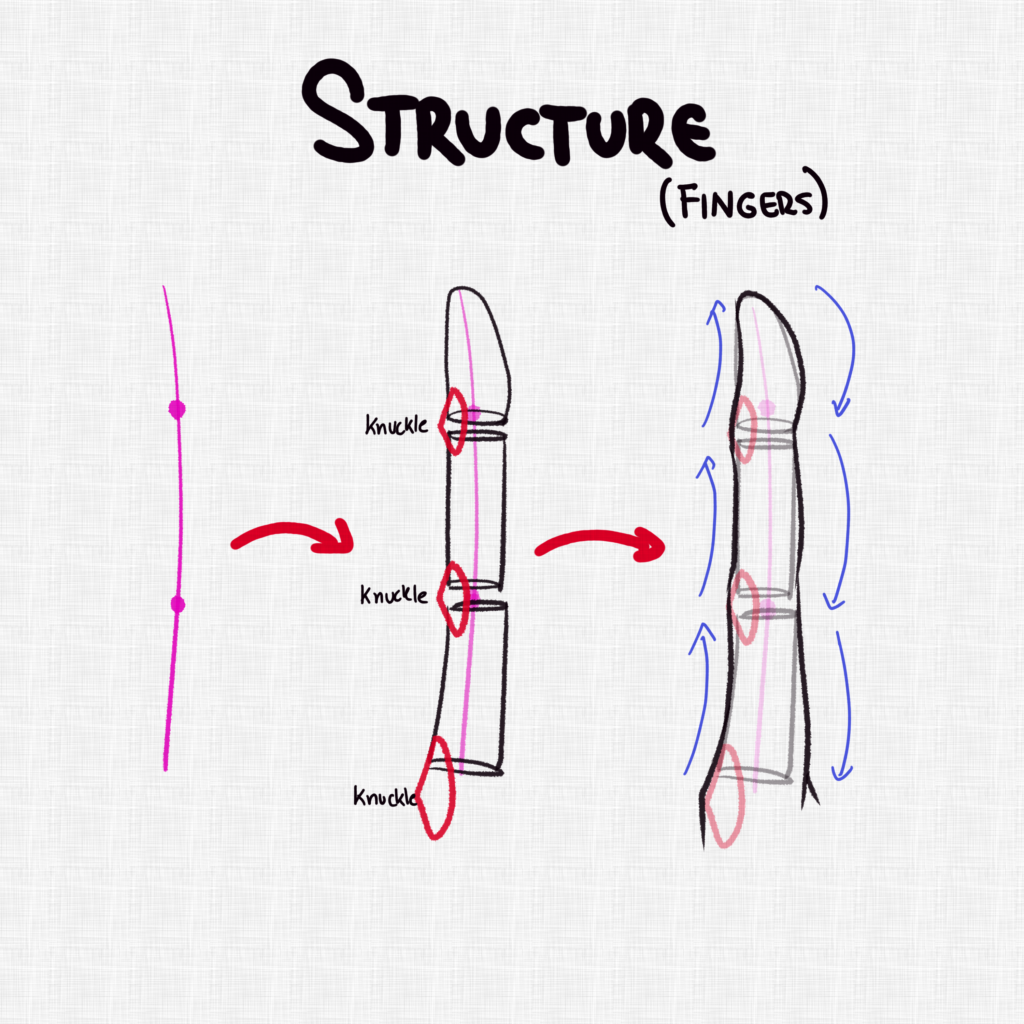
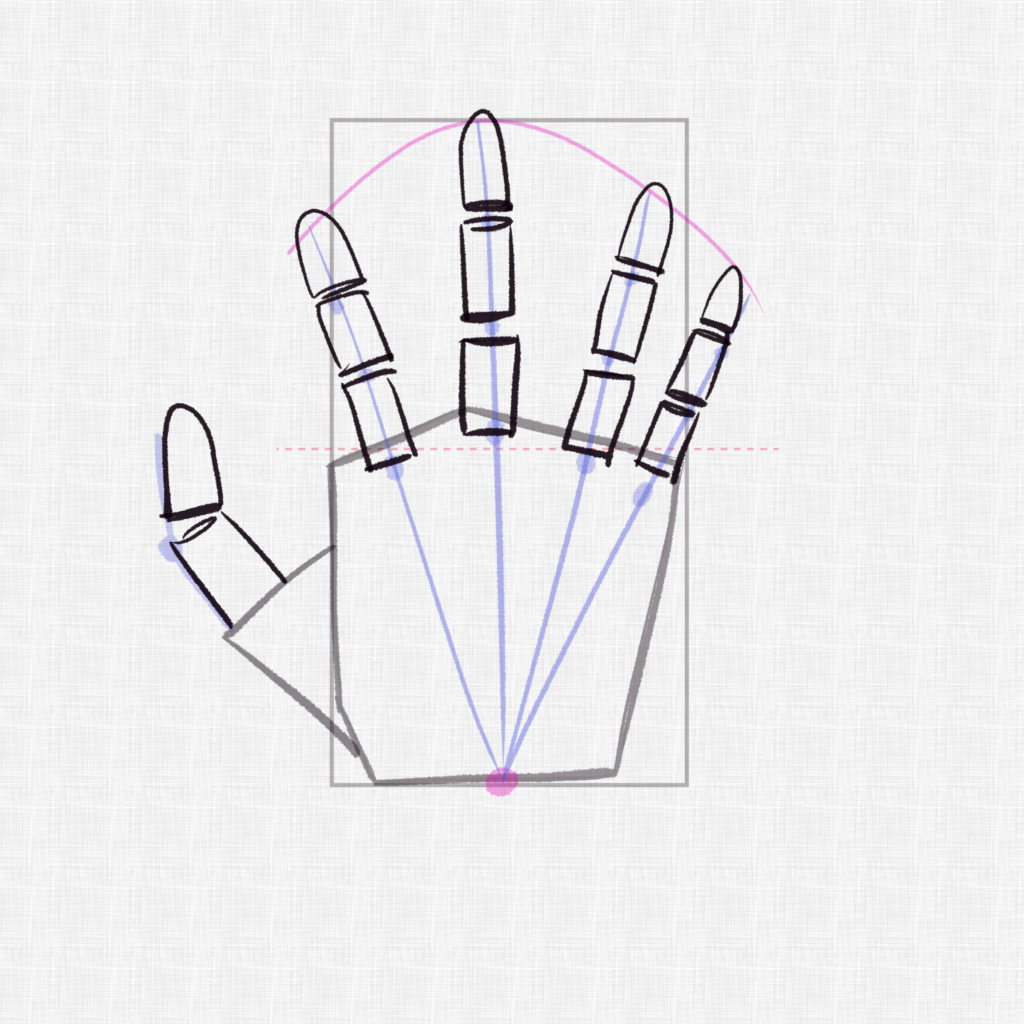
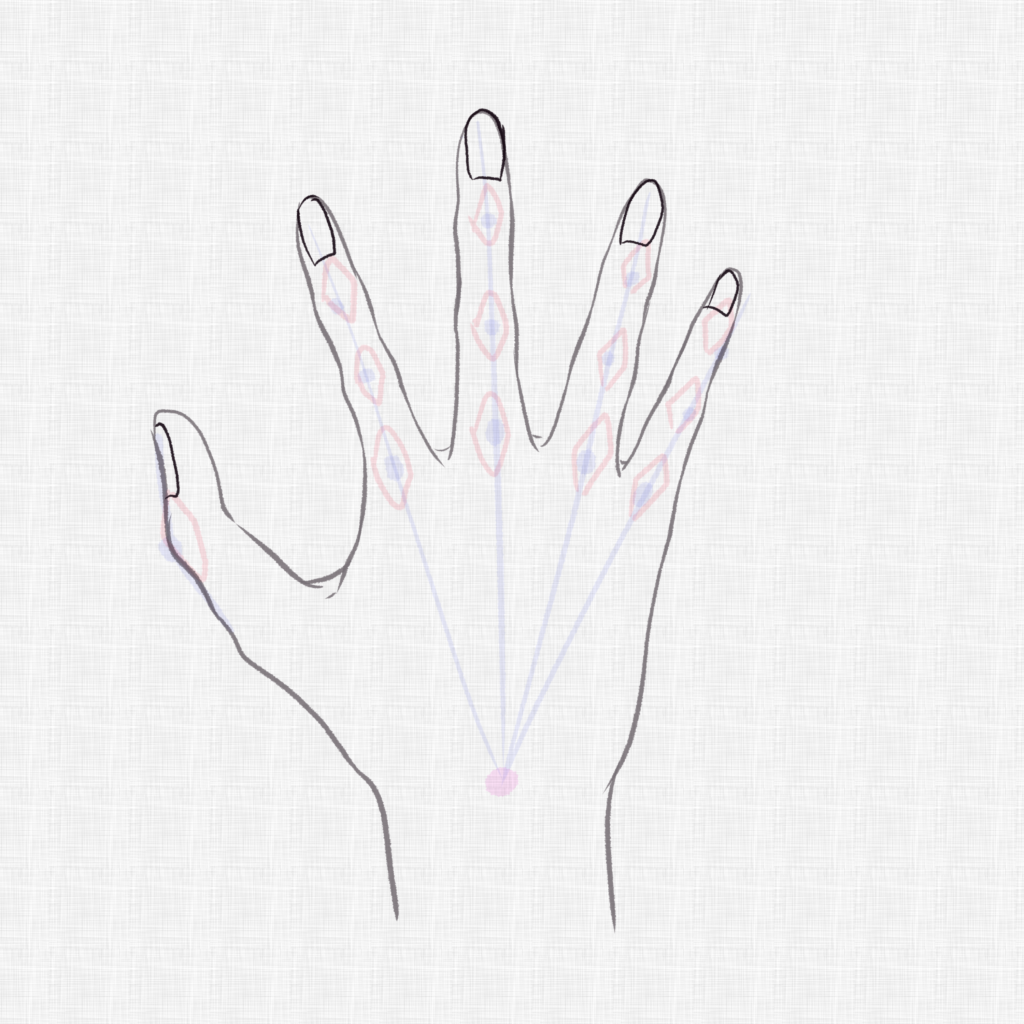
1. Edifice the fingers
It'southward very useful if not vital to locate the position of the knuckles before calculation any shapes, particularly if you don't have any experience drawing easily, to exercise that hands, information technology would be enough to depict three curved lines as shown and signal the knuckles positions in the intersections. Once you have that ready, use cylindrical shapes to form every phalange of the fingers' bones shapes.
ii. The Pollex – Part 2
To turn the pollex into the organic class of a hand, observation is necessary, notice how the skin folds around the thumb and the palm lines are different? Many take made the mistake of confusing the pollex's skin folds for palm lines.
But remember, the palm lines are constant, the pollex folds change with movement.
three. The Fingers – Part iii
The reason I didn't include the fingers' organic class in part 1 was considering I could write and entire article well-nigh finger construction and move, merely let's simply check the basics for now.
The fingers are composed by the phalanges, and the knuckles. At that place is a small knuckle between every phalang and a big one betwixt the phalanges and the metacarpal basic.
When changing from basic shapes to organic forms. It'southward important to remember that fingers are fleshy on the inside.
Since the knuckles are on the back of our hand, that office, when cartoon nosotros tin can represent that with small-scale bumps and that would requite the idea of a finger amend than a sausage similar shape.
iv. The Fingers – Part 4
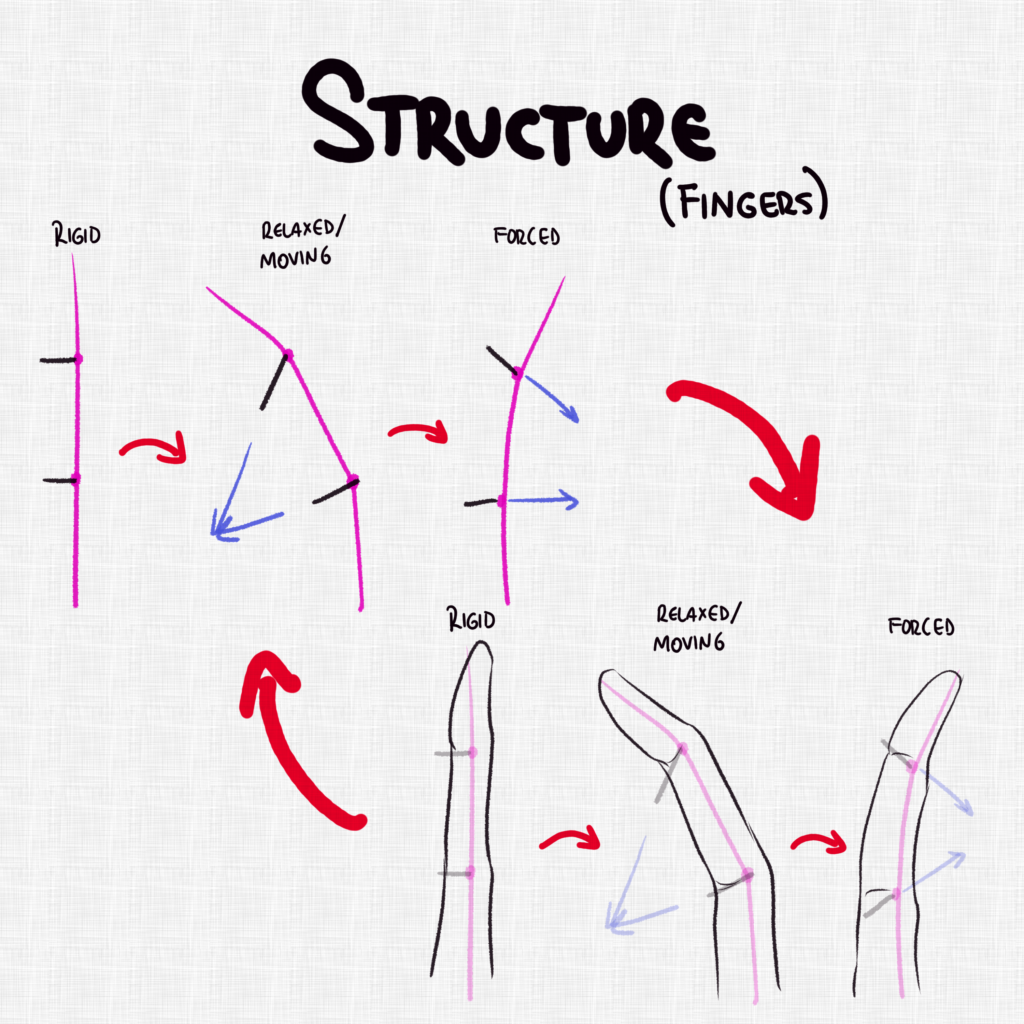
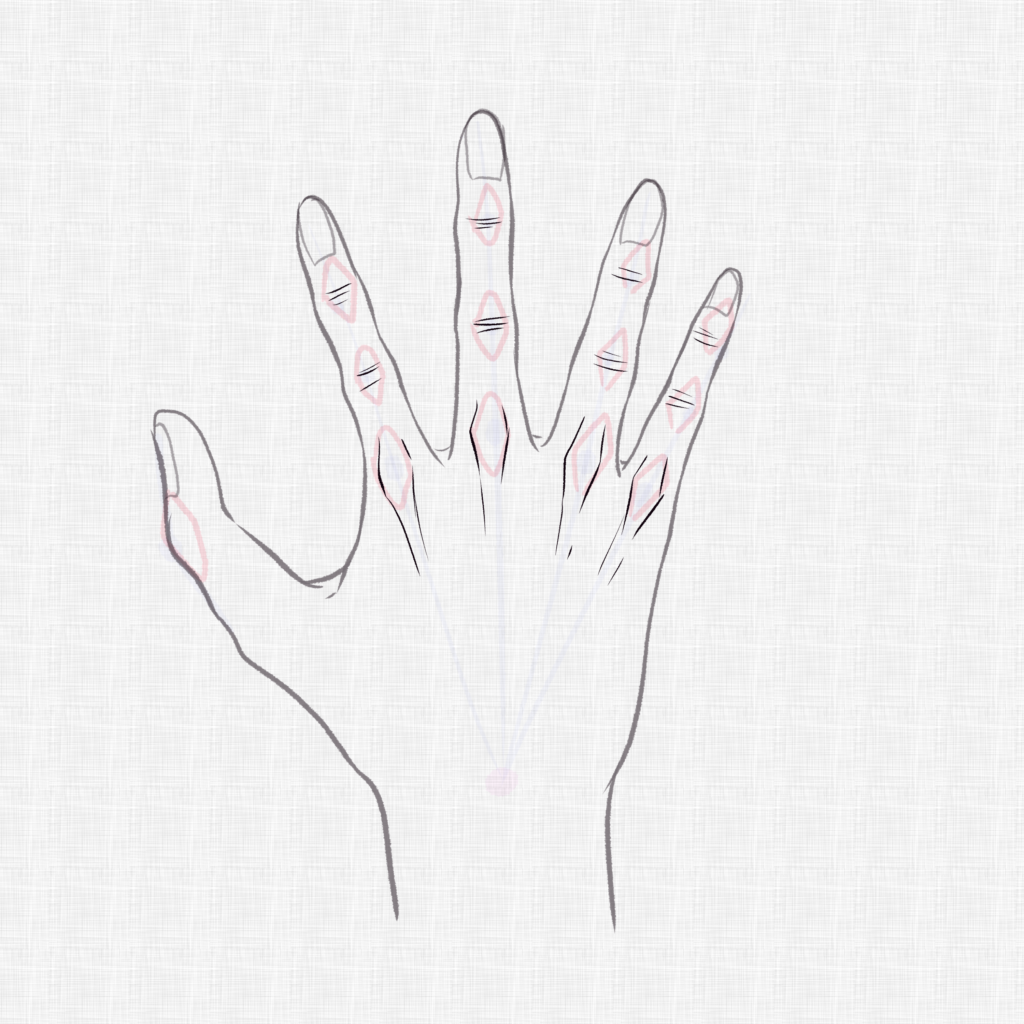
Yes, more about the fingers. Simply those guys are special, what tin I do? Permit's check how the fingers behave when viewed from the front and dorsum as well.
The knuckles are the thickest part of our finger, so when drawing hands, peculiarly boney ones, the knuckles are definitely going to stand up out.
5. The Fingers – Final function
I know! Only it'south necessary so just behave with it a little longer.
When relaxed, the fingers tend to bend in, notwithstanding every bit the fingers are one of that parts of our torso nosotros use the most, we all accept for certain tried to see how far they could be stretched back and how difficult were you able to printing them together.
The divisions in our fingers motility as well, when our fingers are rigid the lines stay horizontal, just as we motion our fingers we can see how they change their bending.
Make certain to remember this when drawing hands. An usual beginner mistake is to place those lines incorrectly.
10. Applying the structure – Part 1

Allow'southward have a random hand and break it down into the basic shapes to run into how would it work.
For example for this pose and angle the palm can exist represented equally shown, for that block that would besides assistance usa locate the fingers.
11. Applying the structure – Role ii
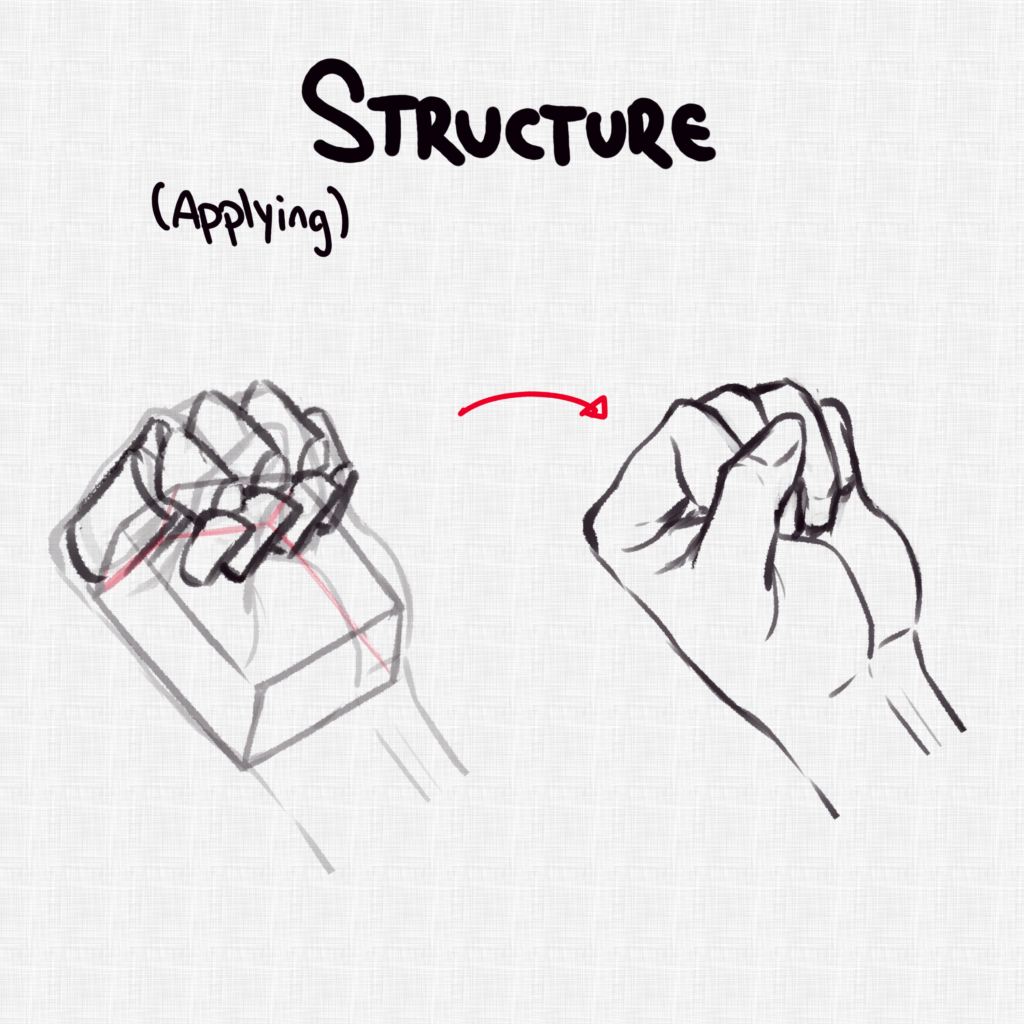
Now, on height of our bones palm shape, building the fingers volition be so much easier!
12. Applying the structure – Part three
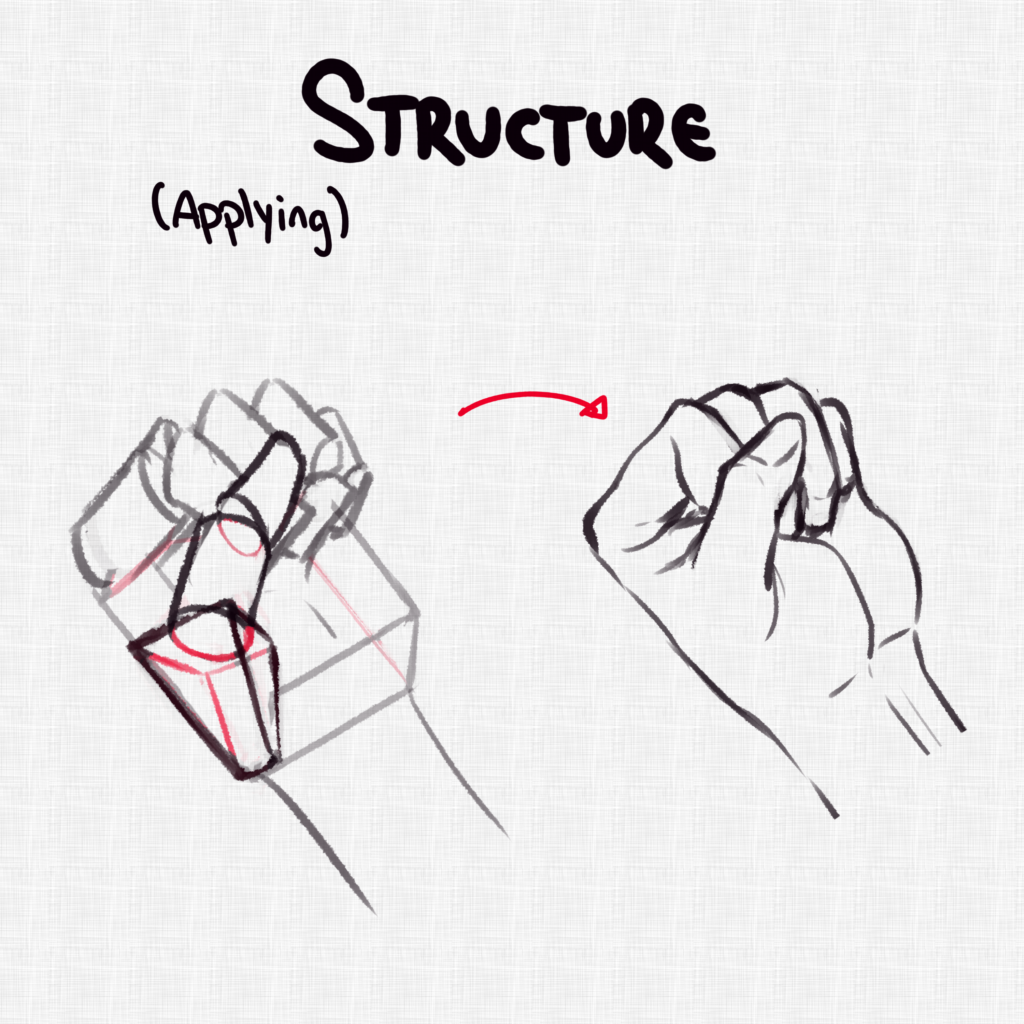
At present let's include the thumb.
The shape moves just lie out pollex does. Try to imitate the movement and experience with your own hands the motility of the thumb.
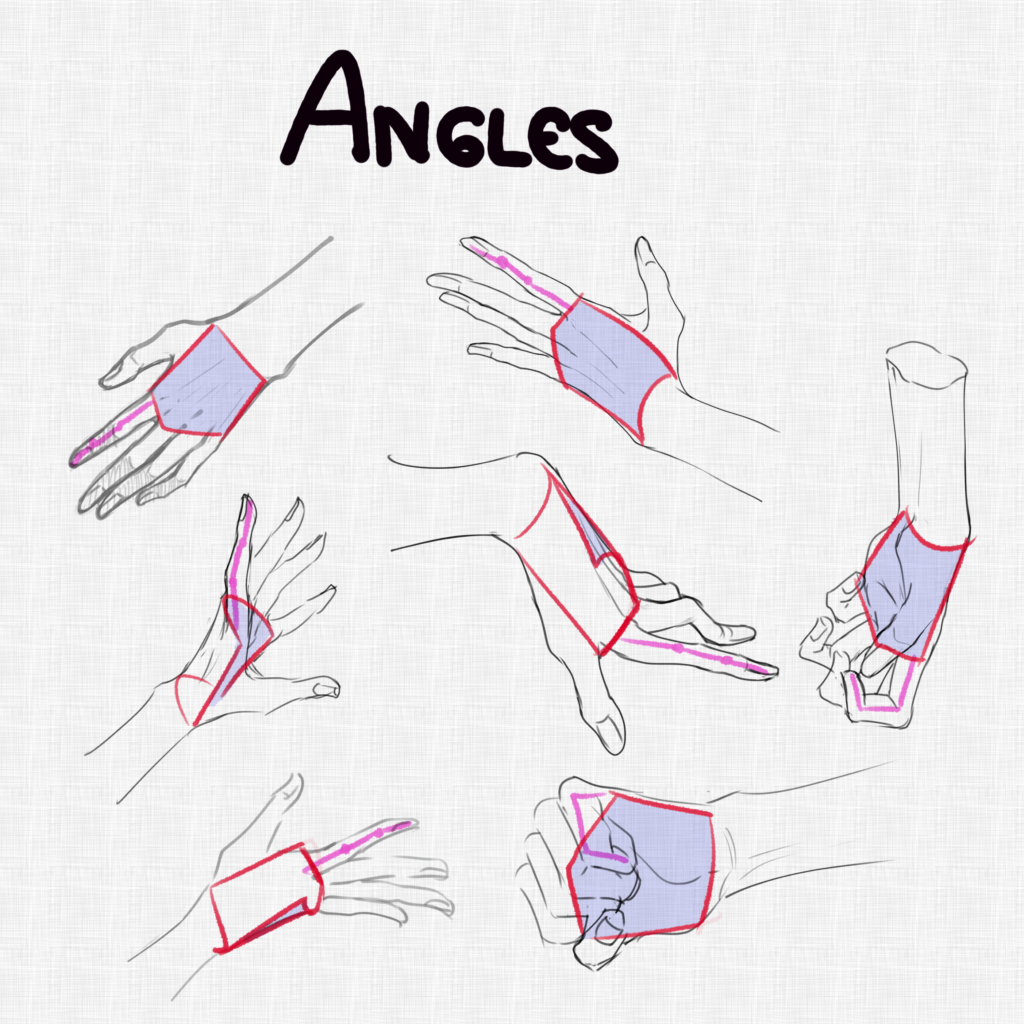
How to Describe Hands from Different Angles
1. Perspective
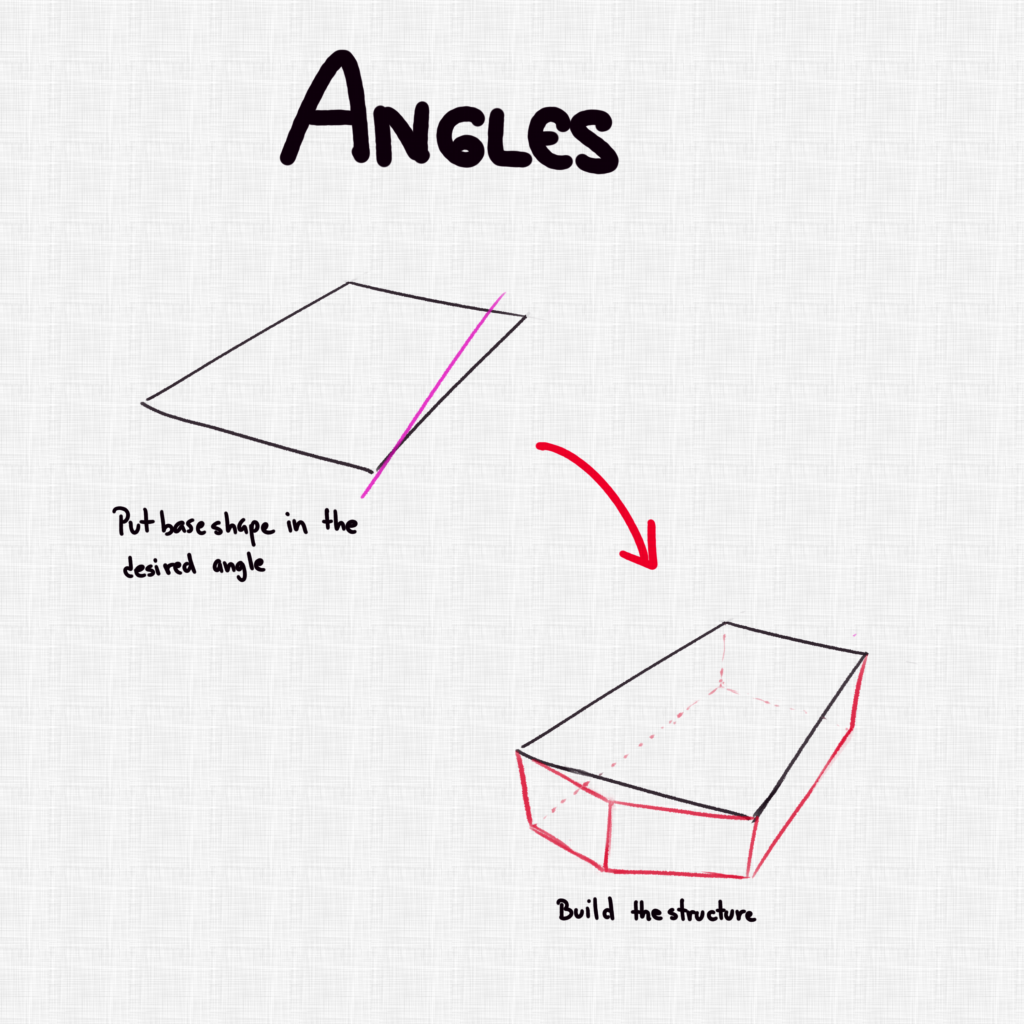
When drawing the paw from different angles, perspective is 1 thing we have to go along in mind. Using our basic box shape as a guide will help us overcome the hardest part of perspective, since it'south way easier to out a rectangle in perspective than a whole manus.
Once you have your rectangle you lot tin can get-go edifice the structure around.
2. Position the fingers
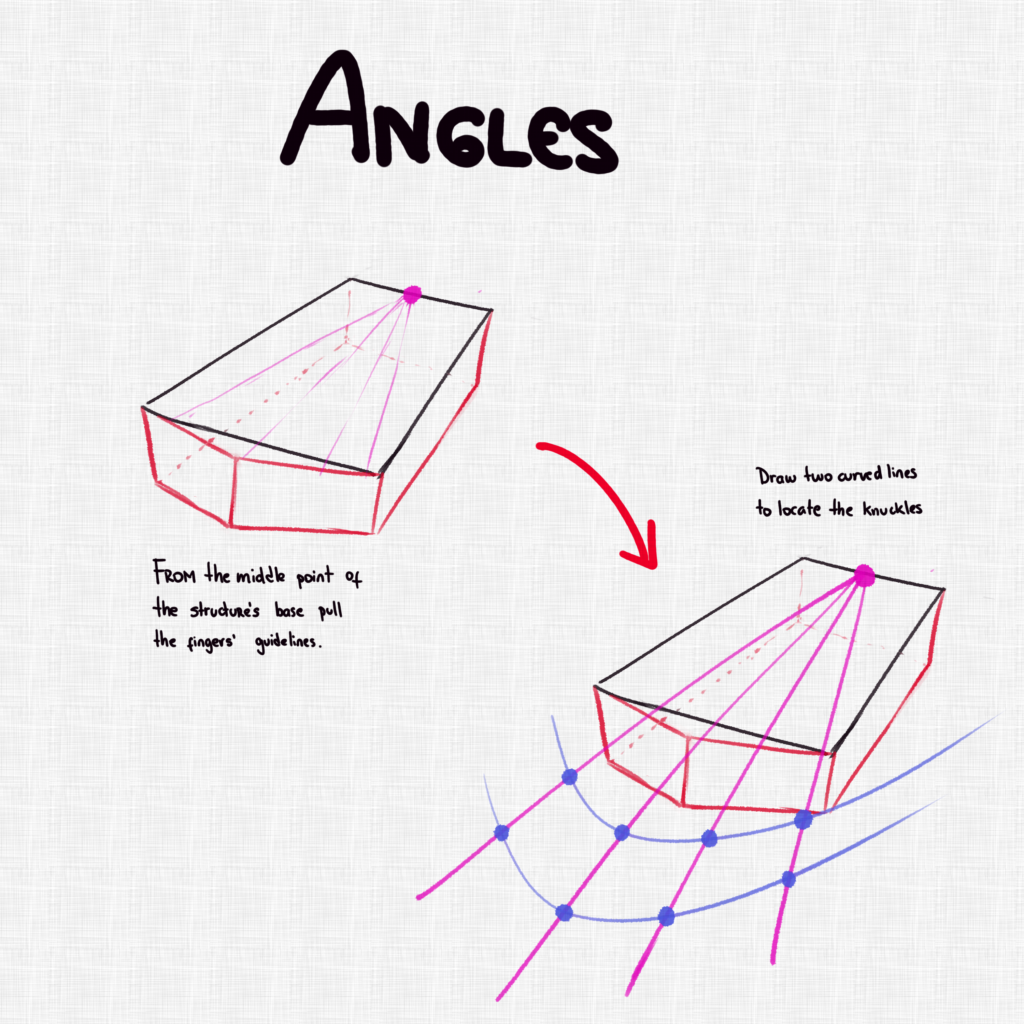
Aforementioned every bit earlier, pulling lines from the center of the palm's base volition help usa locate our phalanges and go on our paw proportionate.
three. The Thumb
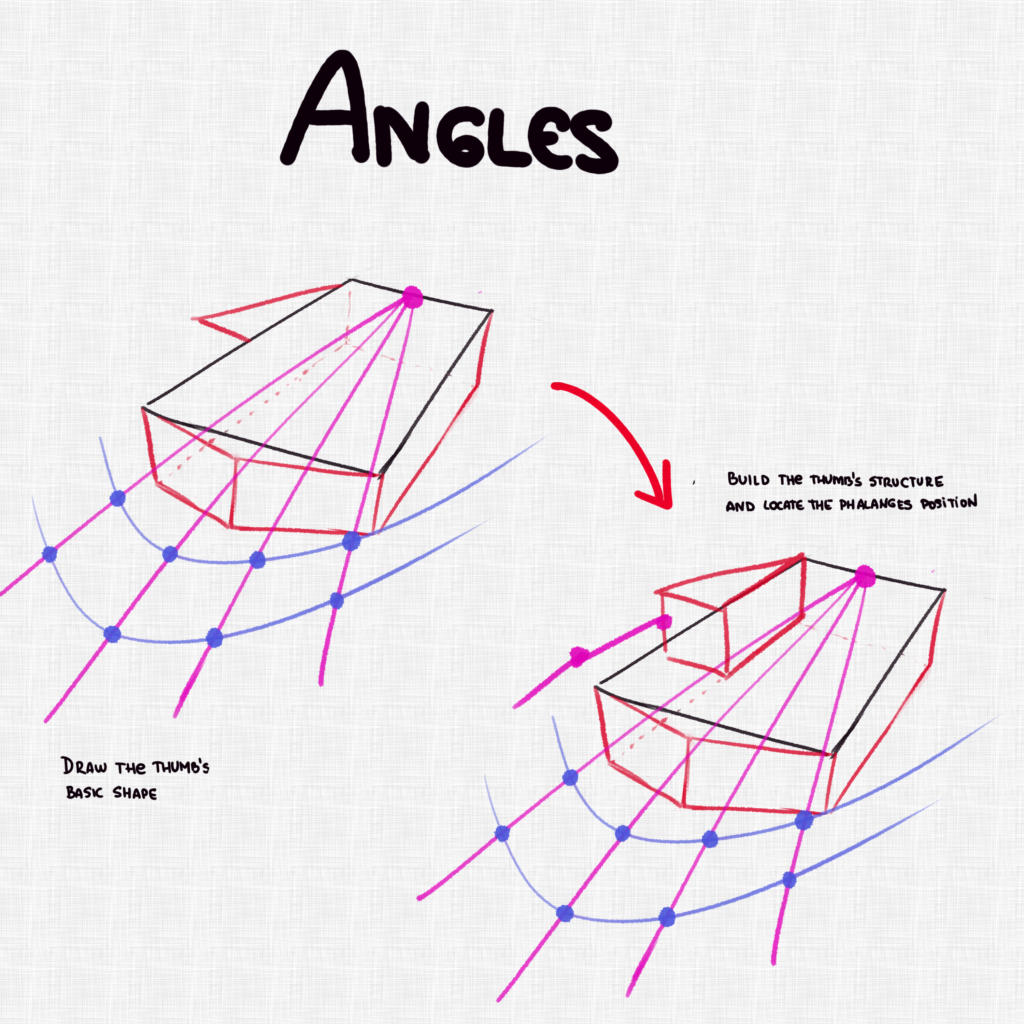
Offset by drawing a triangle and then build the shape under it. Place the phalanges of the thumb and you're washed!
4. Construct the Hand
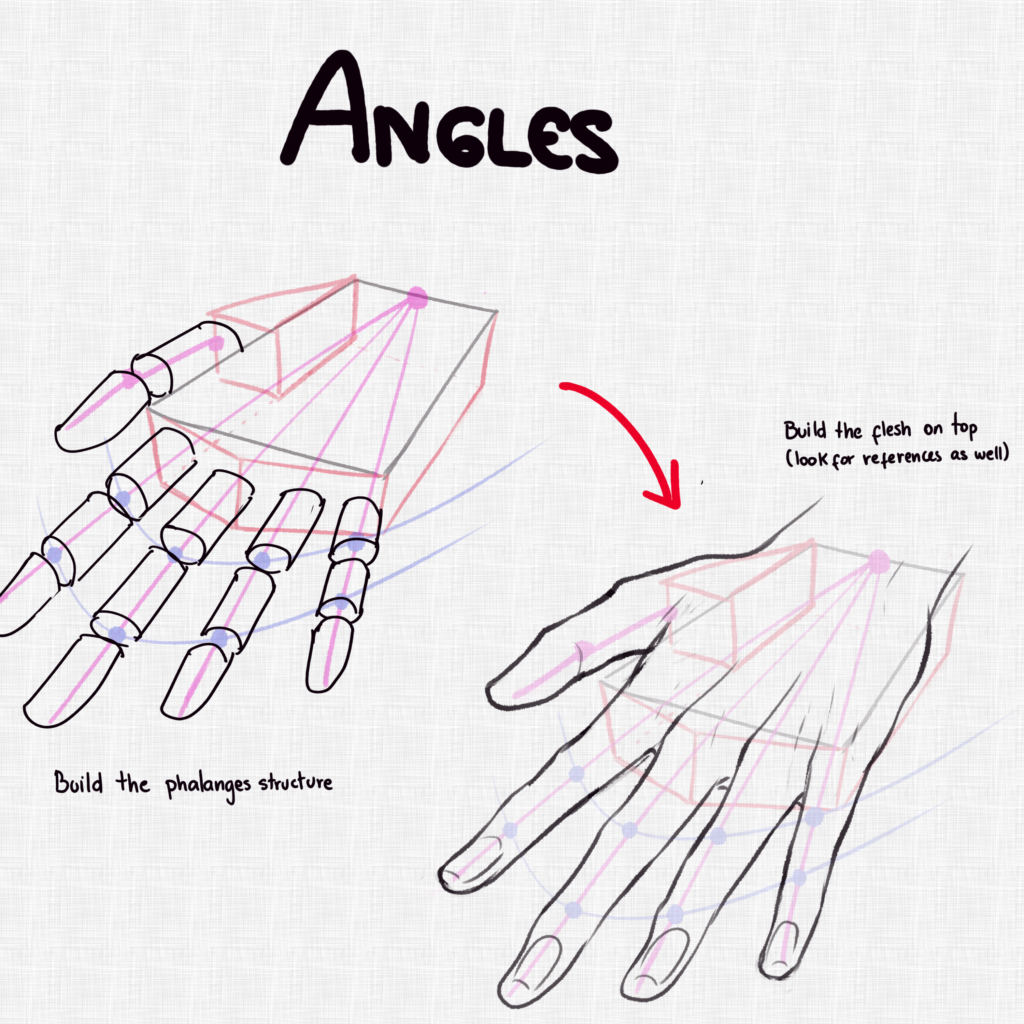
Build the shapes for the fingers and then draw the paw. Sounds piece of cake right? Well, information technology actually is! Just you're going to demand something more.
To exist able to place the outlines of flesh and musculus for every pose and angle is necessary to study easily extensively.
This guide volition merely help you empathise the behind-the-scenes improve.
5. Practice!
I'm non going to lie to you, you won't learn how to draw hands in an hour. Maybe not fifty-fifty in a day or a calendar week. You'll demand to practise quite a bit.
But follow this small tip and when looking at references, identify first the palm rectangle structure and the first phalange y'all see.
Endeavour to build your hand effectually those 2 structure points and I'll assure you, y'all'll learn how to draw hands from whatsoever pose, angle, and shape for sure!
How to Draw and Shade a Hand from Scratch
Now, come draw your get-go hand with me. I'll walk yous through every footstep from edifice to shading.
For these steps you're going to demand both of your graphite pencils, your eraser and your ruler.
Step ane: Describe a Rectangle
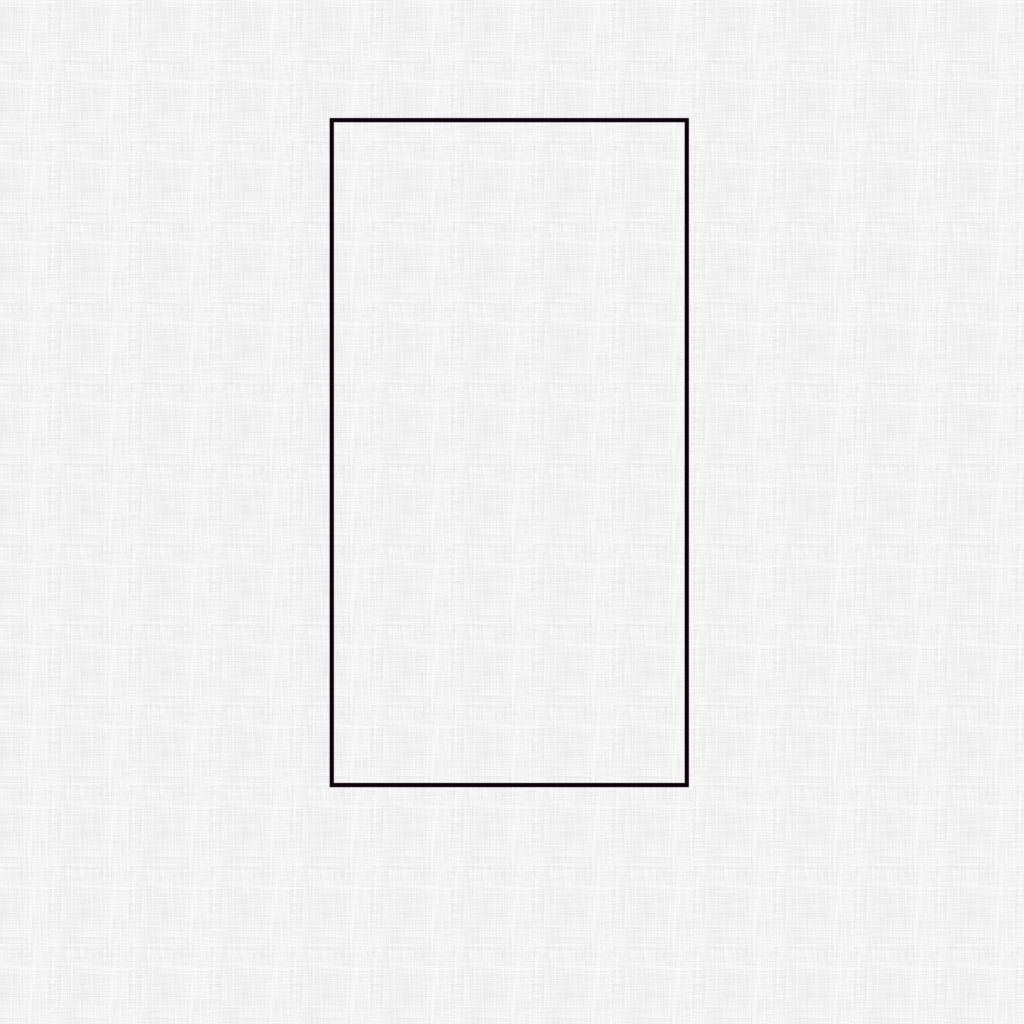
Yes, as uncomplicated as it sounds, this rectangle will be the size of your hand, so draw it equally big as you want your paw to be.
Pace 2: Split your rectangle in half.
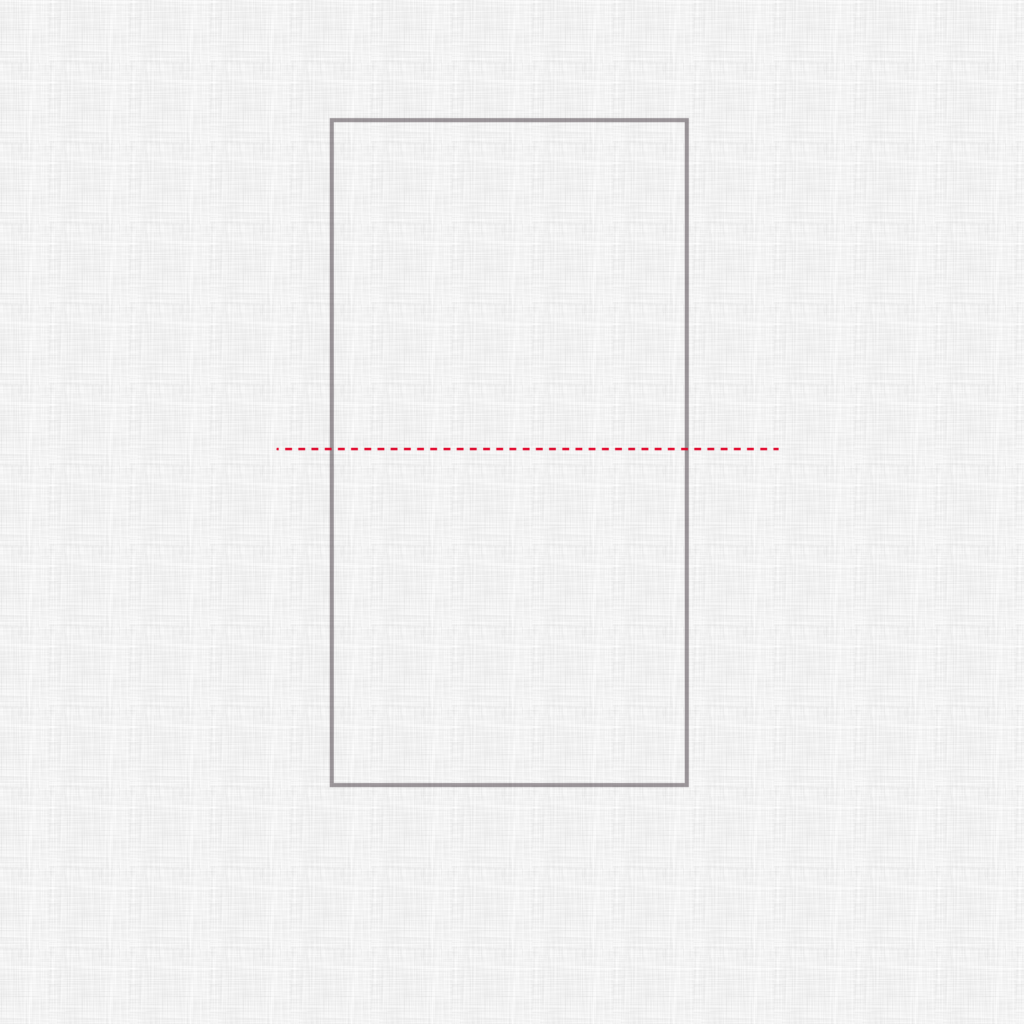
Measure the exact half of your rectangle and describe a soft line cutting your rectangle in one-half.
Step 3: Draw your Palm Structure Shape
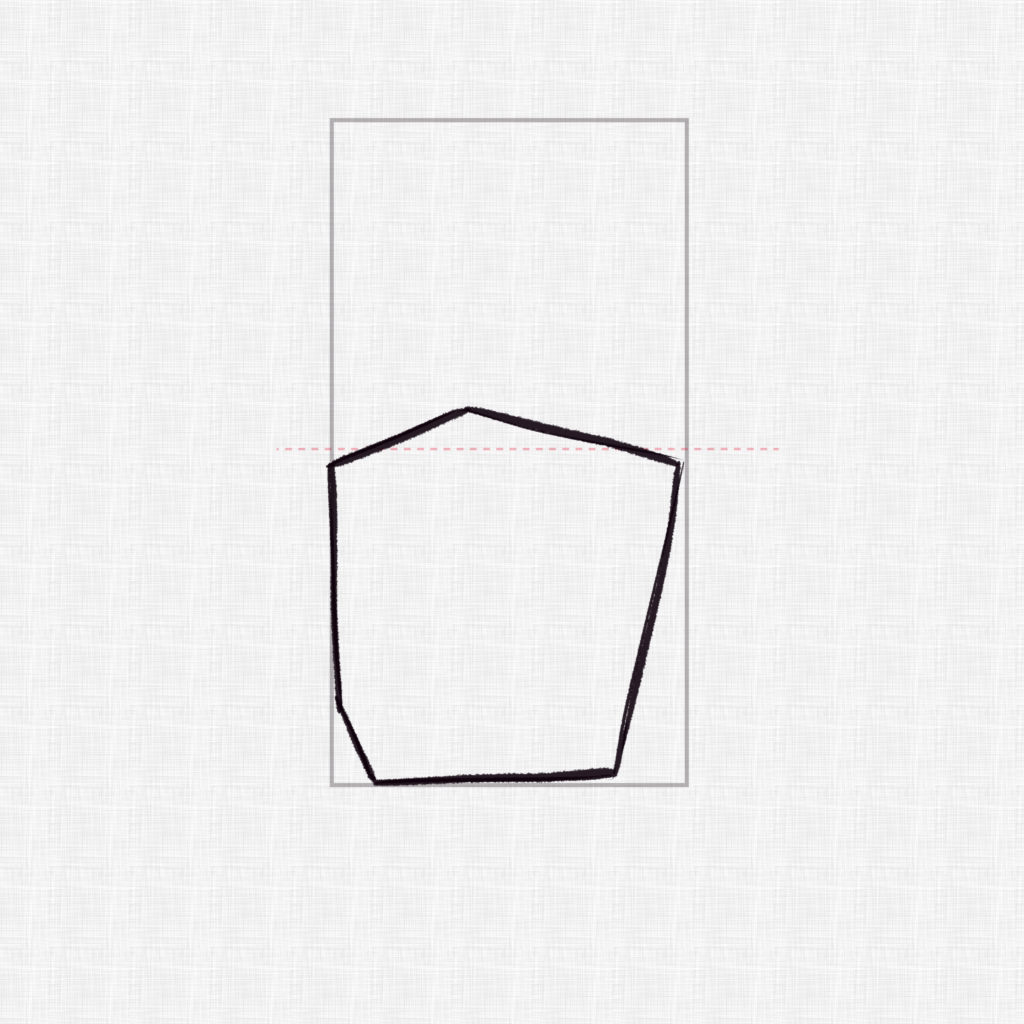
If yous don't know how to do that and then get cheque the construction section of the article. Just making it more dynamic past cutting a portion of the rectangle near the pinky position, an even smaller portions near the pollex, and calculation a minor triangle on top would be enough
Step 4: Add the Thumb Structure Shape

Just add a small triangle. Make it as broad as you lot desire your pollex to be extended.
Step five: Set up the Base for the Fingers
Locate the center point of the palm and trace a curved line on the top, exist conscientious to non get over the rectangle.
Step 6: Locate the Knuckles and Set the Pollex's Construction
Cutting the fingers sections in equal parts, signal the duke softly and draw the lines for your thumb, in the position you want information technology to be.
Step 7: Build the Fingers
Since we're taking it slow, nosotros're going to build the finger by sections as I showed you lot in the fingers part of this commodity, retrieve, cylindrical shapes.
Footstep 8: Add the Duke
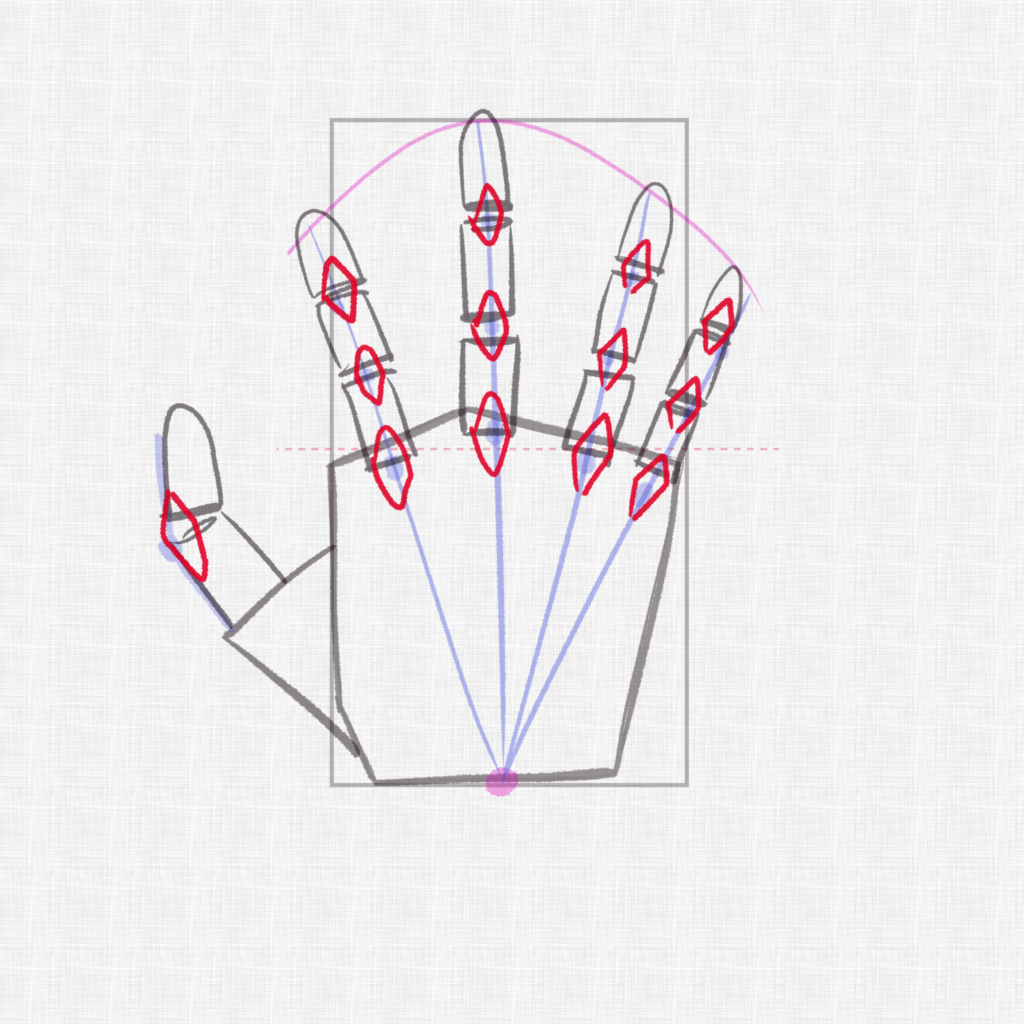
Softly bespeak the knuckles as diamond-like shapes, making the upper knuckles smaller than the lower ones.
Stride 3: Build the mankind around.
Erase your guidelines and start building the flesh around. With soft and curvy shapes draw the outline of your hand, taking the knuckles and peel folds into consideration.
Step 4: The Nails
Now add the nails. Ii curved vertical lines and one curved horizontal line will practise.
Step 5: The Knuckle's Skin.
Now we but have to add the skin details for the knuckles and metacarpal bones, just hinting the positions so that we can shade and blend them later.
Stride half-dozen: Shade the Paw

Apply soft traces around the fingers giving the illusion of book and shade also under the duke of the fingers softly, for the lower knuckles, shade effectually them, following the shape nosotros hinted earlier. Blend your traces and erase the excedentes of graphite.
Last Step: Deepen the Shadows and Add Details
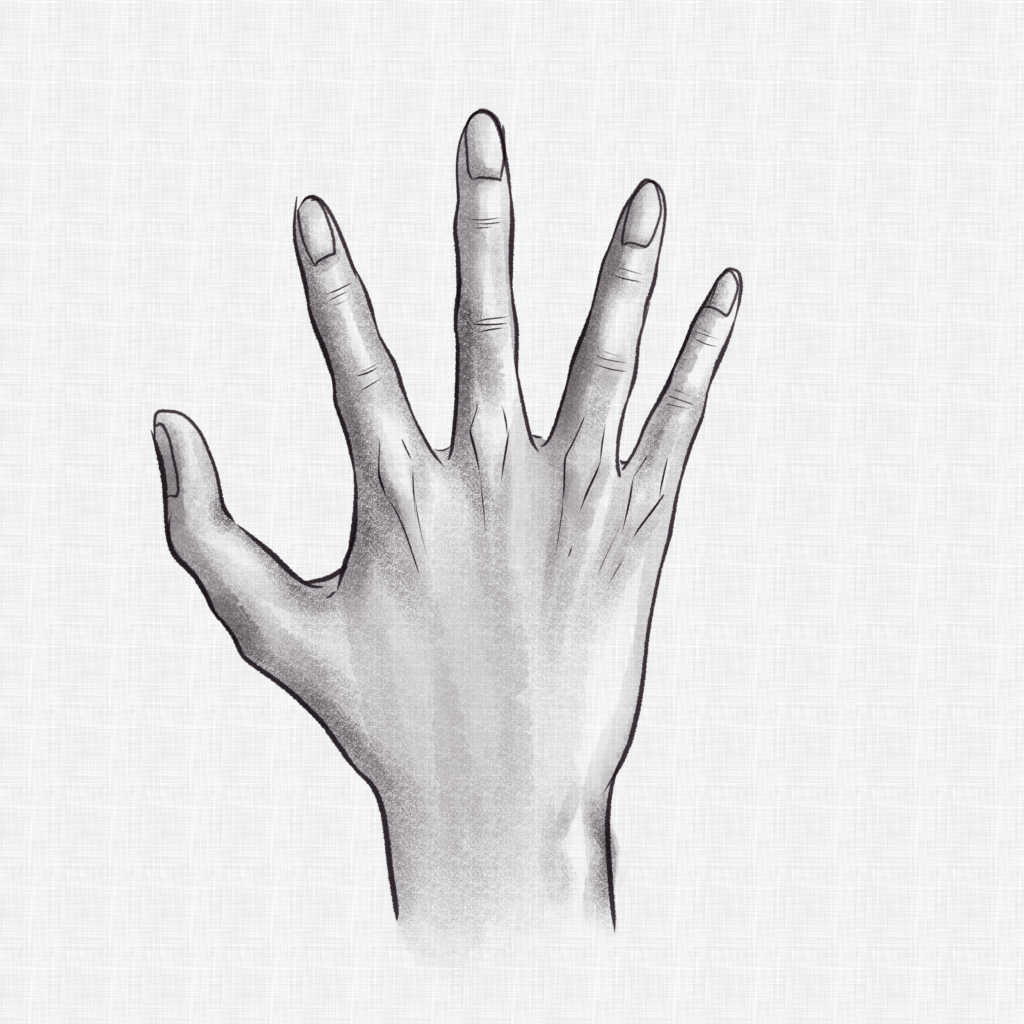
Now we're going to take into consideration where the light is coming from and shade the parts where the shadows are casted strongly. We're non going to use our blending tool simply just trace with soft round movements this will give the illusion of our peel's texture and a more realistic look.
And that'southward it! I hope you learned more most hands, I hope y'all practise equally well, and thank you for reading this article and for cartoon a hand with me!

Source: https://www.artlex.com/art-tutorials/how-to-draw-hands/
Posted by: schroederfrossuche.blogspot.com
0 Response to "How To Draw Hands Easy Step By Step"
Post a Comment